On this page
| Table of Contents |
|---|
| Info |
|---|
Current version: 2.0 If you have an older version, please refer to this guide instead: Place Grid Tile 1.0.3 Configuration |
What’s New
Language preferences: Content can now be customized to display personalized content based on user's language (site administrator must set display option for language preferences in the configuration panel).
Improvements to layout and usability including: bug fixes with display of images, ability to configure the fonts and colors for the text, custom HTML in header and footer, and accessibility compliance. We’ve also changed the names of some of the menu items in the configuration panel to be consistent with our other tiles. For example, Places and Content are now part of Setup.
| Info |
|---|
If you have more than one language available for set up in your tile, choose which language that the Search Header and any other Customizable Tabs or Search Results Calls to Action this will be displayed in. The default preference is English. After you’ve configured in one language, if you pick another language, you’ll be asked if you want to display the same features for the second language (by copying the settings) or “create from scratch”. Refer to Installing Your Tile for more details on the multi-language set up. |
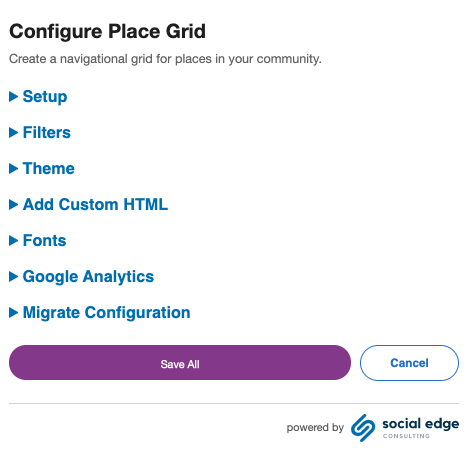
Configuring the Place Grid Tile
| Info |
|---|

To display the tile’s configuration panel, click the gear icon in the upper right corner of the tile.
Select Setup
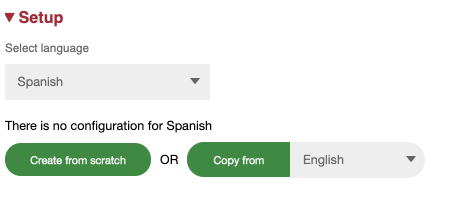
Note: If you have enabled multilanguage option in your configuration, you will see an option to Select Language. In this example, you can configure in English or Spanish. Once done with English, you can then select what will be displayed for Spanish-language speakers.
Choose between Automatic or Manual:
Automatic
Select the exact space to include in the grid. If there are subspaces, they will display as well.
Check Include parent space if you would like the parent to display as well

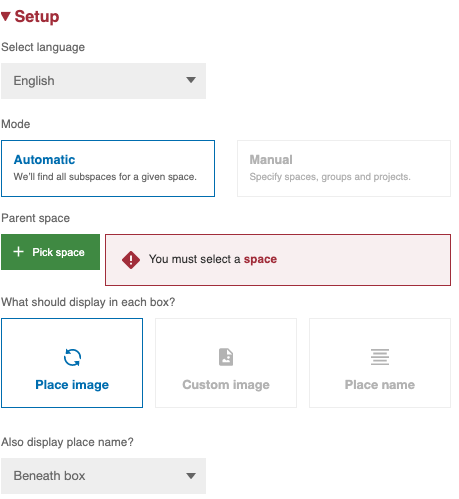
NOTE: You cannot uncheck the subspaces, If you do not want all or some subspaces to display, choose Manual mode instead.
Manual
Cherry-pick which places or links you would like to appear.
Places: When you add a space you will be given the option to select its subspaces.
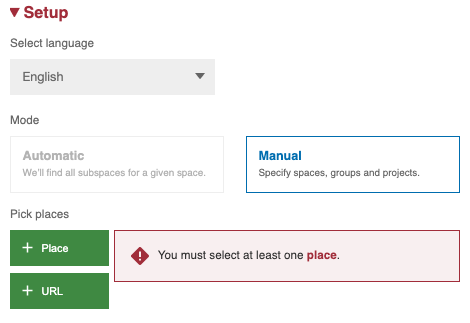
NOTE: If a project(s) are associated with a space or group, you must select them individually, they will not be part of the “include subspaces” checkbox.
URL: In addition to places, you can also add a URL to any link if you select Manual.
Add link title
Add URL
Add tags
Select if you want the link to open in a new window
Once your links are set, you can modify the order in which they appear by dragging and dropping the places up or down.
Click AZ to have them display in alphabetical order
Save All now before moving on to the next section. Scroll to the bottom of the tile and click the Save All button.
| Note |
|---|
You are not required to save after editing each section, but we recommend you do to avoid accidentally closing the configuration panel without saving. You can click Cancel to cancel all your changes and leave the configuration panel. |
Setup: Configuring the Box Content

Select how you would like the place tiles to display.
Place Image -Automatically pull in the place’s main image (avatar)
Custom Image -enter the URL for the custom icon’s image (see below).
Note: Adding a custom image will not add the custom image to that place's’ avatar and it it will not replace the current place avatar if one existed.
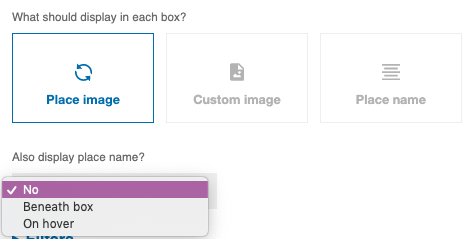
If you have selected to display an image Place image or Custom image, you can select from the following options to display the place name under Also display place name:
No - will not display the place name
Beneath box - place name will appear below the image
On hover - place name will appear when the user hovers their mouse over the image
Place Name - Displays the place names in the assorted grid tiles.
Adding Images
To add images to your tile, you will first need to upload them in the community. Simply click the gear icon in the upper right corner of the place you are working and select Static resources. (Depending on the version of Jive you have, this may say Image Files instead of Static resources)
In the popup, click Upload a File and select the image(s) you want to use in the slider.
When using a custom icon, we suggest uploading a 40x40px icon. If your icon is a bit larger, don't worry; it will be resized.
Once you upload your images, copy the URL to your clipboard and paste each URL into a notepad to have handy when working in the Slider configuration panel.
Configuring in another Language
Optional: once done configuring in English (which is the default setting), click on the Select language and choose the next available language. You will then be asked if you want to Copy from the English default setup or Create from Scratch.
The same option will be available for Filters and the Custom HTML as well.
Configure the Filters
To help users sort through all displayed places, you may pre-define several tags, grouped as Filters. When a tag is selected, the grid will animate to remove non-matching places. For each filter, you must specify
Filter Heading: This is the categorical label for a group of tags. For example, if your tags are “red,” “blue,” and “green,” your filter heading may be “Colors.”
Display name for tags: You can write a friendly name for each tag. For example, your tag may be “so-cal” but your displayed tag can be “Southern California.”
Place Tags: These are the place tags associated with each display name. In the example used above, “so-cal” is the place tag. If this tag is added to the place metadata for a particular place, that place will remain in the grid when this tag is selected.
A preview is displayed at the top of the the filter configuration area. Wide view shows the appearance of filters in large columns, whereas narrow view simulates the filters as they will appear in mobile or in Jive’s skinny sidebars.
Note that if you add 5 or more tags, the horizontal bar will convert to a dropdown due to space constraints. Therefore, the horizontal bar is intended for scenarios where a maximum of 4 tags need to be displayed.
If you add several filter headings, each with their own set of tags, the filters will display as several dropdown menus.
Here’s how to add a new filter:
Select New Filter to add a new filter category
2. Add details for your categories
Add the Filter title
Click Add Place Tags if you want to feature places based on tag and for each item add the Display name and Associated tag
Repeat the above steps for each additional Filter
NOTE: The horizontal link bar will be displayed when only one filter category is added, with less than 5 place tags. Otherwise, dropdowns will be displayed.
Notes on adding Filters:
If you add one Filter
In the Wide View the links will display in a horizontal bar
In the Narrow View the links will display in a dropdown menu
If you add multiple filters
In the Wide View the links will display horizontally as separate dropdowns
In the Narrow View the links will display in a dropdown menu
Configuring the Theme
Filters - Select your colors for the Filters
This includes what color appears when the button is selected (clicked upon) and unselected
NOTE: You can type the basic colors into each color field. For example, red, blue, green, brown, black, white, yellow, purple, orange. For other colors, you can enter hexadecimal values. If you don’t know the hexadecimal value, convert your colors athttp://rgb.to.
Place boxes - This section also includes the selecting the color of the text inside the box.
Advanced -Set the advanced configuration options including:
Gutter
Max items on initial load
Open links in a new window?
Tile padding
Configuring the Fonts
| Info |
|---|
Configure Google Analytics
| Info |
|---|
Configure the HTML Header
| Info |
|---|
Copying your Tile Settings
| Info |
|---|
Best Practices and Tips
Best Practice/Tip | How To… |
Static Image URLs | Upload all your images and copy the Jive generated URLs for each uploaded image to a notepad before you begin configuring your slider. You will need to paste these image URLs into the image URL field. |
Backup | Copy all CSS and HTML, including the code in the Migrate Configuration options to a text editor. Save this file locally or to a cloud storage system. |
Rules for adding multiple tags to a Category | The admin can specify only one tag display name, but there is no restriction on entering text in the tag field (like commas). If needed, you can add logic that following AND rules for multiple tags. For example, there are two places:
Correctly filled fields:
|
Rules for layouts | When the Place Grid Tile is placed in the wide column, and Category Display names are being used (no drop-down), the tile will place an "All" button filter. When the Place Grid Tile is placed in the narrow column, and Category Display names are being used, the filters will still display as a drop-down. However you will not see an All button, you will see the Category Title of the one Filter. So be sure to use an intuitive name like "All Categories" or simply "All." |
Support
Need support or want to talk to us? Please send an email to:
support@socialedgeconsulting.com