On this page
| Table of Contents |
|---|
| Info |
|---|
Current Version: 3.0. or 3.0.2 If you have an older version, please refer to this guide instead: Search Tile Configuration v. 2.0.3 |
What’s New
Configuring the Search Tile
Parts of the Search Tile can now be customized to display personalized content based on user's language (site administrator must set display option for language preferences in the configuration panel).
Improvements to search results including ability to display collapsed search results, adding filters to restrict place results to subspaces, highlighting search terms in the results as well as making promoted terms visually distinct. In addition, the tile has been updated to meet accessibility requirements.
| Info |
|---|
If you have more than one language available for set up in your tile, choose which language that the Search Header and any other Customizable Tabs or Search Results Calls to Action this will be displayed in. The default preference is English. After you’ve configured in one language, if you pick another language, you’ll be asked if you want to display the same features for the second language (by copying the settings) or “create from scratch”. Refer to Installing Your Tile for more details on the multi-language set up. |
To access the tile’s configuration panel, click the gear icon in the upper right corner of the tile.
You are now ready to configure the tile.
Save All now before moving on to the next section. Scroll to the bottom of the tile and click the Save All button.
| Note |
|---|
You are not required to save after editing each section, but we recommend you do to avoid accidentally closing the configuration panel without saving. You can click Cancel to cancel all your changes and leave the configuration panel. |
Configure the Search Results
If there no additional languages have been set up, your tile configuration will look like this.
Otherwise, it will look more like this

Select Search Result Section from the Tile Menu.
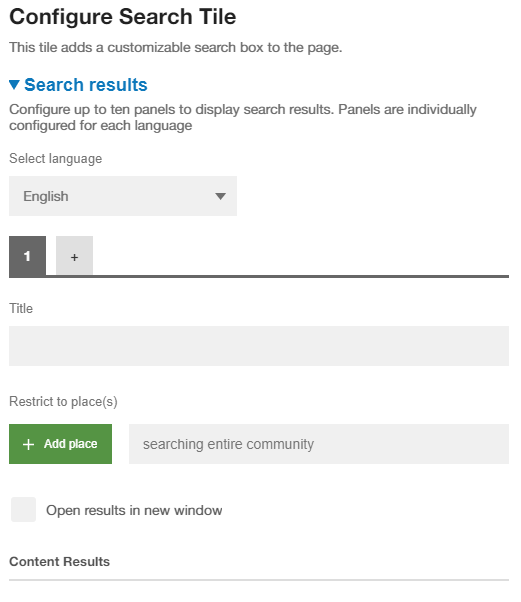
Configure the Search Panels
This feature allows you to add separate filters to the search results, focusing the search tile on different Places and types of content. We recommend filling in a few tabs for best results. Repeat steps 3-6 below for additional panels.
Click the + to add additional search result panels
Note: You can add up to 10 panels
Add a title to each search result section. For example, “Documents” or “Answers.”
Select the Place(s) you want the Tile to search. Click the + Add place button to restrict search to specific places(s).
Note: This field is optional. If you leave it blank, the tile will search the entire community.
Select Open results in a new window or leave unchecked
Choose your Content Results
To show all content types, leave Restrict to content type blank. To restrict results, enter content type in the text box. Use a comma for multiple content types (e.g. document, discussion). See below regarding Discussions and Questions in Jive 9x (hosted/cloud).
| Info |
|---|
Version 3.0.2 has fixes a bug for how in which if only Discussions were selected, both Discussions and Questions are displayed. It affects difference in Cloud version still were displayed in the search results. However, there’s a difference between the Cloud version vs. Jive 9.x (hosted, on premise). We’ve adjusted our language for this. Jive Cloud - we can show Discussions and Questions together or separately
Jive 9.x - we can't show Discussions and Questions separately due to a limitation in the API
|
Choose from the additional data to display with the results(all options below are unchecked by default):
Show excerpt
Show author
Show creation date
Show modification date
Show Place
Show structured outcomes
7. Choose to display People Results by checking the optional box
8. Choose to display Places Results by checking the optional box
9. Save your changes. Scroll to the bottom of the tile and click the Save All button.
*Repeat the steps above for each search panel added.
Configuring the Theme
Select your brand colors for the following tile elements:
Search input area
Header text
Header background
Search box background
Search button
Search button hover
Search Box width
Results
Section header
Results title
Metadata
Excerpt
Results background
Footer
Footer text
Footer background
Button text
Button background
Dropdown background
Button hover
Set the Search Box width by dragging the slider to the desired percentage.
Enter any desired Placeholder text, which will indicate to users what the search field is for. For example, “I’m looking for…” or “Enter a search term.”
Set the Rounded corners by choosing on or off from the dropdown menu.
Note: Leaving “search box background” blank will set this value to transparent. If you’re using the tile on a News page and your page has a darker background color, the search input will display on top of the background color; therefore, with enough contrast, the white search input will be visible.
Tip: You can type the basic colors into each color field. For example, red, blue, green, brown, black, white, yellow, purple, orange. For other colors, you can enter hexadecimal values. If you don’t know the hexadecimal value, convert your colors athttp://rgb.to.
Note: This section also includes a preview, so you can see the Theme updates before you publish any changes.
Configure the Display Configuration Options
Update the Display Configuration options for the tile’s Header & Footer
Select a display option for Header mode from the following options:
Left header
Tabbed header
No header
Left Header | Tabbed Header | No Header |
Select a Display mode for the Footer mode from the following options
Left footer
Centered
No footer
Legacy Footer*
*This will be an available option if you had HTML in the footer in the previous version of the Search Tile. You can choose to continue to use that, or use the configuration options to have a call to action.
Configure the Header
Configure the Header text, which will appear in the search box. If the header is disabled in “display mode,” this text will be ignored.
Add optional Sub-text, which will appear beneath your Header text in Left header display mode, or to the right of the Header text in Tabbed header display mode.
Note: You can style your Sub-text with HTML, e.g. bold or italicize words or phrases, or add links.
Configure the Footer
Configure the Footer text by adding in optional copy for example, “Can’t find what you are looking for?”
Add in Button text, for example, “post your question” “ask us”
Choose the location you want the question to be posted to by searching for the appropriate place.
Check the box below if you want to post the question in the current place
Check if you want the button to open in a new tab
Save your changes. Scroll to the bottom of the tile and click the Save All button.
Configuring the Fonts
| Info |
|---|
Configure Custom HTML
| Info |
|---|
Configure Google Analytics
| Info |
|---|
Copying your Tile Settings
| Info |
|---|
How to Copy Your Tile Settings aka, Migrate Configuration Settings |
Best Practices and Tips
Best Practice/Tip | How To… |
Static Image URLs | Upload all your images and copy the Jive generated URLs for each uploaded image to a notepad before you begin configuring your slider. You will need to paste these image URLs into the image URL field. (See Section 1.4 above.) |
Accent Color | Use darker colors for the accent color to enhance the visual effect of the slider. |
Headlines | Keep your headlines concise to avoid text cutting off. |
Fonts | Ask your branding team which Google Font is most similar to your brand font for the easiest font setup. |
3 Column Layout | Be mindful when using the slider in the center of a 3-column layout as the width of the slider in that format can become as small as using the tile in a sidebar column. |
Action Links | Make your action link short and actionable like "Learn more", "Find out why", "Start exploring". Avoid text like "click here" or "click this button”. |
Support
Need support or want to talk to us? Please send an email to:
support@socialedgeconsulting.com