On this page
| Table of Contents |
|---|
| Info |
|---|
Current Version: 2.0. or 2.1.2 If your version is older, please refer to this guide instead: Blog Tile Configuration version 1.4.3 |
What’s New in 2.0
Ability to show manually-curated blogs, add a "teaser" to the display
Option to either curate a set of blog posts or allow blog posts to display automatically (dynamically)
Display different blog posts depending on language preferences. Language preferences are set by the site administrator.
Improvements to layout and usability including: Preview at top of the configuration panel, alternating layout in list form, custom HTML in header and footer, and accessibility compliance.
What’s New in 2.1
Support for OR and AND filters
Allow multiple tags in an item filter.
Display Trending blog content.
Apply character limit on desktop content like masonry content
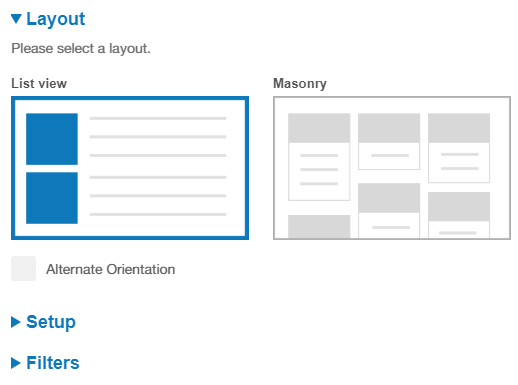
Blog Tile Layout
Choose your Layout. There are two different modes or layout options to choose from:
List View
displays blogs in a list view
displays blog in list view with image alternating left and right per row
Masonry View
displays blogs in a masonry view
Note: You must select a layout before continuing to edit the other components of this tile.
Once you select a layout all other feature sections display and you are now ready to configure the tile.
View when alternate layout is selected

| Note |
|---|
NOTE: If you added Copy to the Migrate configuration section you will not need to fill out any of the sections in the Blog Tile.) |
Save All now before moving on to the next section. Scroll to the bottom of the tile and click the Save All button.
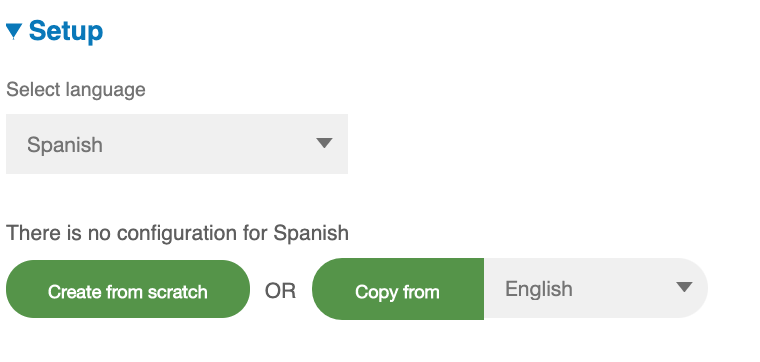
Blog Tile Setup
| Info |
|---|
If you have more than one language available for set up in your tile, choose which language this will be displayed in. The default preference is English. After you’ve configured in one language, if you pick another language, you’ll be asked if you want to display the same posts for the second language (by copying the settings) or “create from scratch”. |
Add the Tile Header
Click Add Blog to select the blogs you want to display in the tile.
You can select one or multiple blogs to display
You choose to feature a specific blog at the top of your blog list (for details see new features below)
You can choose from personal blogs, system blogs and place blogs
You can choose whether to manually curate a list of blog posts (for details see new features below)
Note: You must select at least one blog to continue.

Choose to Restrict by Tag
If you select this option, you will be asked to enter in the tag(s) below. Enter in one or multiple tags, separated by a comma.
Restricting by a tag(s) will only return results with the specified tag(s) and may override additional filtering managed in the “Filters” section (see below).
Note in version 2.1: You can have “OR” results. Simply add a comma (,).
Set the Preview Image. Choose what image you would like to display.
Image from the post
Author avatar
None
Set the Date to display. Choose from the following options:
Relative
Absolute
Hide
Select what metadata you would like displayed by checking the box for the following:
Show Author
Show divider lines
Show border
Alternating row highlights
Save your changes. Scroll to the bottom of the tile and click the Save All button.
Additional New Features in the Setup
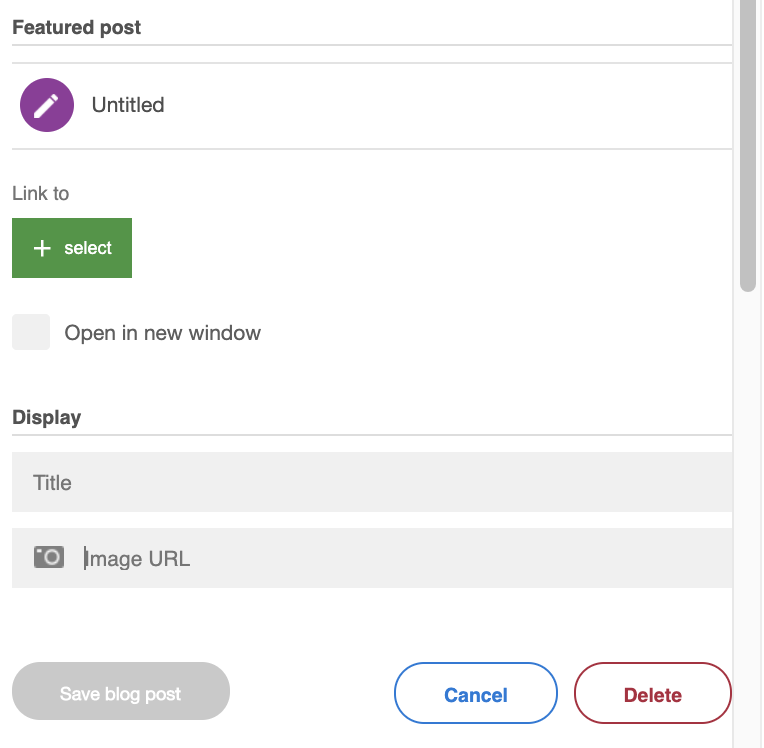
To add a Featured post
Click on the button that says Add Featured
Browse for the blog post in Jive and select it. Enter a Title and Image Link as needed and Save.
The Featured Post is available for use with either a Dynamic or Curated option.
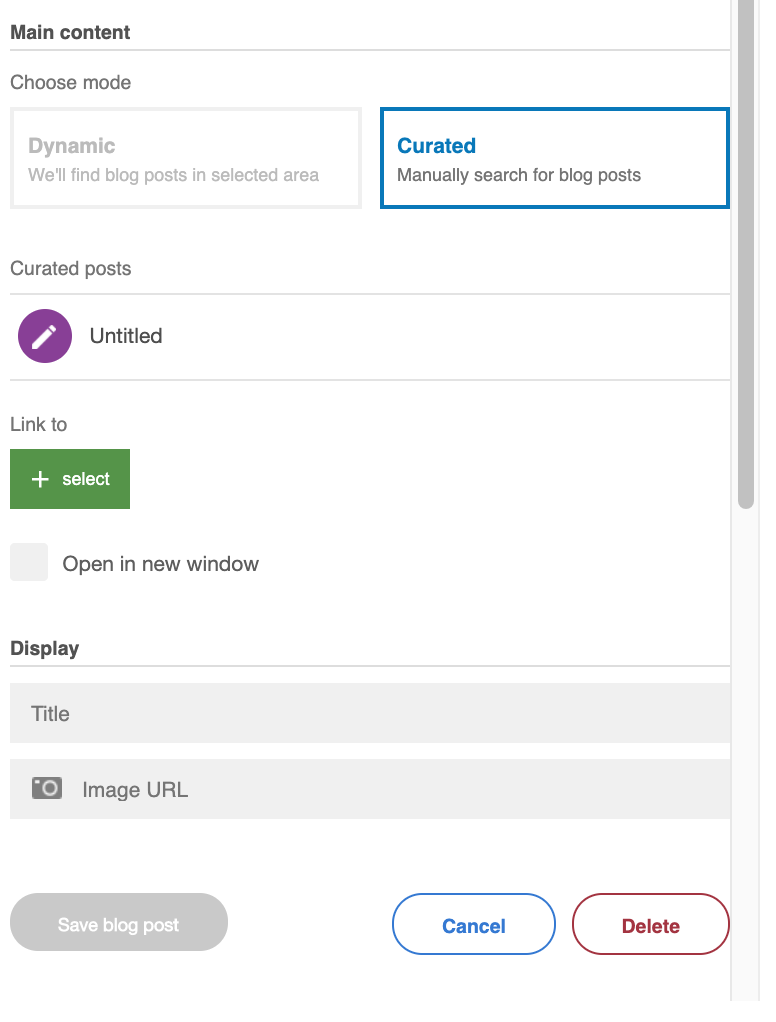
To add a list of specific blog posts, select the Curated option. Continue with picking individual posts to display in the same way as how you selected a featured blog post. Note: Filters will not be in use when using the Curated Feature.
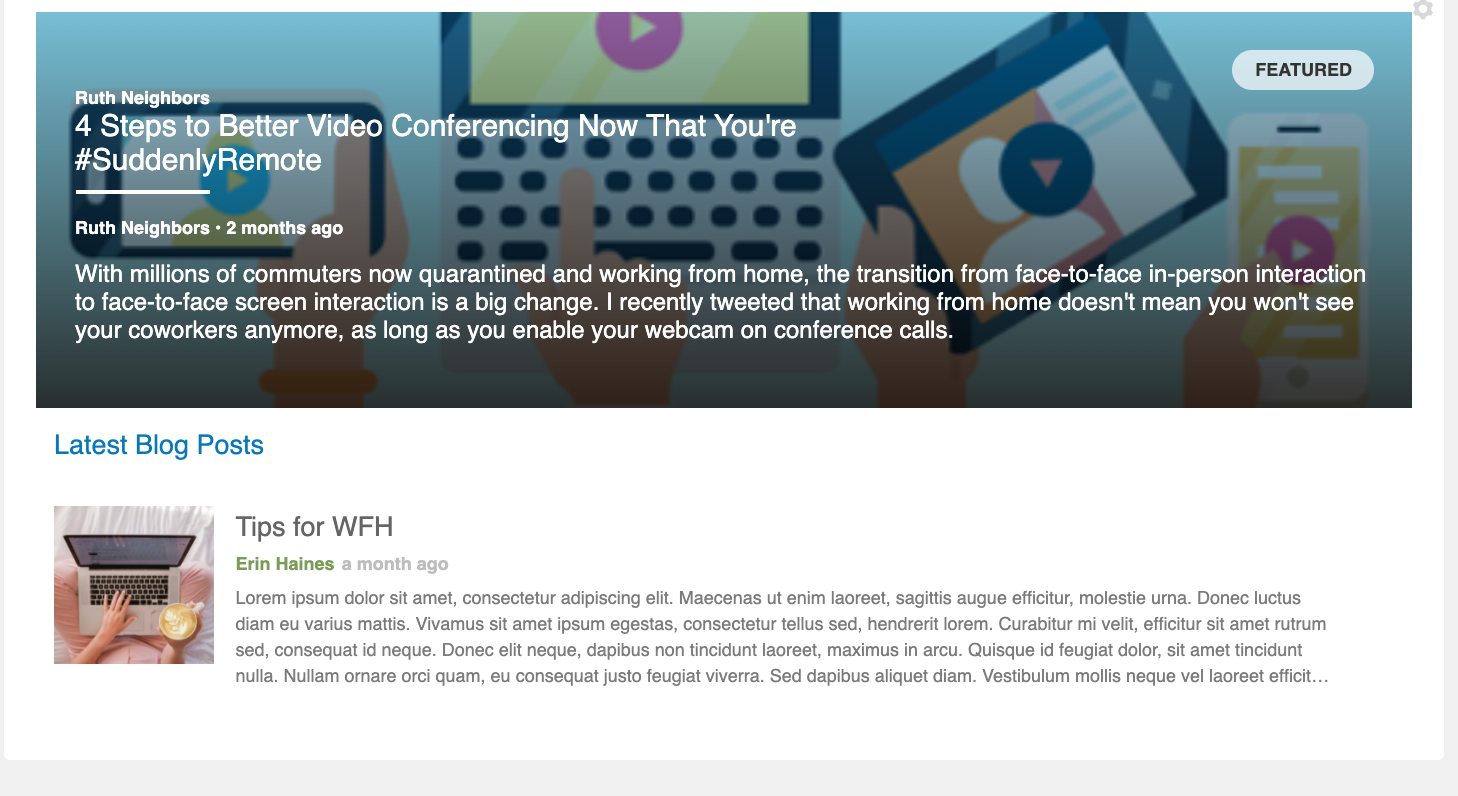
Here is an example of what you will see with a featured tile and either a curated or dynamically chosen tile below.
New in version 2.1: Trending Blog Content
There’s yet another way to showcase content, in this case, trending blog posts. Simply select Dynamic and then check Show Trending Content, and then choose the blog or the entire community.
When this is checked, filters will not be available.

Blog Tile Filters
To help users sort through all displayed places, you may pre-define several tags, grouped as Filters. When a tag is selected, the grid will animate to remove non-matching places. For each filter, you must specify
Filter Heading: This is the categorical label for a group of tags. For example, if your tags are “red,” “blue,” and “green,” your filter heading may be “Colors.”
Blog Post Tags: These are the place tags associated with each display name.
Display name for tags: You can write a friendly name for each tag. For example, your tag may be “so-cal” but your displayed tag can be “Southern California.”
Set default filter: Check this box on the filter you want visible when the blog first loads on the page. These will be the posts users see first.
A preview is displayed at the top of the the filter configuration area. Wide view shows the appearance of filters in large columns, whereas narrow view simulates the filters as they will appear in mobile or in Jive’s skinny sidebars.
| Info |
|---|
NOTE: If you add five or more tags, the horizontal bar will convert to a dropdown due to space constraints. Therefore, the horizontal bar is intended for scenarios where a maximum of 4 tags need to be displayed. |
If you add several filter headings, each with their own set of tags, the filters will display as several dropdown menus.
Here’s how to add a new filter:
Select New Filter to add a new filter category
Add details for your filters
Add the Filter heading
Click Add Blog Post Tag if you want to feature places based on tag and for each item add the Display name and Associated tag
New in version 2.1: To have the results pull back more than one tag in a specific filter (eg Tag1 AND Tag2), simply put in a comma (,) between the tags.
Repeat the above steps for each additional Filter
Note: The horizontal link bar will be displayed when only one filter category is added, with less than 5 blog post tags. Otherwise, dropdowns will be displayed.
Click Set as default for the filter you want displayed as the default
Notes on adding Filters:
If you add one Filter
In the Wide View the links will display in a horizontal bar
In the Narrow View the links will display in a dropdown menu
If you add multiple filters
In the Wide View the links will display horizontally as separate dropdowns
In the Narrow View the links will display in a dropdown menu
| Note |
|---|
NoteWhen using the Blog Tile, users can opt to clear any selected by clicking the Clear filters option in the user interface. |
Configure the Theme
If you have configured Filters above, you can adjust the button style of the filters.
You can adjust the settings for the following components:
Unselected border color, radius, and thickness
Unselected text and background color
Selected border, background and text colors
Next, configure the main components of the Blog tile Theme:
Select your colors for the following components of the blog display:
Tile header
Article title
Author
Date
Excerpt
Divider
Tile border
Article background/Row highlight.
Note: If you have selected alternating row highlights (selected in Setup above) the colours will display differently depending on your selected mode.
List View
this color controls the background of every other row
Masonry
this color controls the box background
Select your colors for the button style this includes the following options
Background
Background hover
Text color
Text color hover
Border color
Border thickness (in pixels)
Border radius (in pixels)
Note: You can type the basic colors into each color field. For example, red, blue, green, brown, black, white, yellow, purple, orange. For other colors, you can enter hexadecimal values. If you don’t know the hexadecimal value, convert your colors at http://rgb.to.
Preview
As you adjust the theme, the preview at the top of the section will update with your changes so you can preview the theme before publishing.
Custom HTML
| Info |
|---|
Google Analytics
| Info |
|---|
Migrate Configuration
See How to Copy Your Tile Settings aka, Migrate Configuration Settings
Related articles
| Filter by label (Content by label) | |||||||||||||||||||||
|---|---|---|---|---|---|---|---|---|---|---|---|---|---|---|---|---|---|---|---|---|---|
|
| Page Properties | ||
|---|---|---|
| ||
|